
In the past couple of weeks I have heard many remarks about family sizes.
People have yet to question our decision to have two children, but instead I always get the following responses: "oh, a boy and a girl, that's perfect," "two, that's a good place to stop," "you must be done now, two is more than enough for me!"
Recently the Duggar family announced that they are expecting their 20th child. It's unbelievable how many times and places I have heard this brought up. "20!?! Do they know when to stop?" "That's just rediculous, no one should be allowed that many children!" "She had a bad 19th pregnancy, they'll risk another?" "Isn't she too old? The grandchildren are older than her children!"
Why can't we just leave the blessing of children up to God? Let Him make the decisions for us?
Society has warped it's view of children so much that we now find it normal to praise and rejoice single, unwed mothers. Yet when a child is created by a loving, married couple, who already has more than two, they are condemned and questioned.
Should everyone have 20 children? Of course not, we are not all called to do so. If a stable environment has not been prepared to welcome children, abstain. Hubby and I abstained our entire courtship and engagement. Sure it was difficult, but worth it! Not only did it strengthen our relationship, but it was impossible for us to bring a child into an unstable environment.
When a couple takes so much care to make sure they only welcome children into a loving and stable environment, why are they questioned and talked about in such a negative manner? One, three, eight, twelve, or even twenty children need not to be questioned when God is the center of a couple's marriage.
In today's society children are "things" that just happen. Sometimes by accident and other times they are so planned there is no room for God to unexpectedly bless us. Children come from God. Sure my husband and I have had a huge part in creating both of our children, but we were blessed with them only because He wanted us to be. Would we allow our greatest treasure to rot and collect dust? Of couse not! Why then do we continue to treat children in this way? They deserve the very best and the very best is a loving and stable home with two parents who love each other and are open to God's will in all aspects of their lives. Whether God's will is one child or twenty children, it is His plan that is best for our children.
Wednesday, November 16, 2011
Monday, November 14, 2011
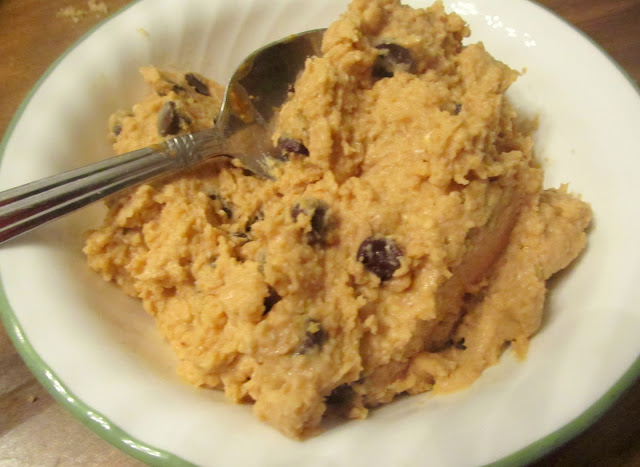
Munchy Monday - Chocolate Mug Cake
My little sister turned 22 today! In honor of her birthday, I made her a cake...and then I ate it.

Sometimes you want just a small slice of chocolate cake, but who wants to heat up the oven, make a huge cake, and somehow keep your fork from helping you devour the entire thing? Alright, eating the entire cake sounds great, but my waistline definitely doesn't need it!
Enter the "mug cake." There are plenty of cake recipes made for your microwave, but I have yet to find the perfect one. There is absolutely no way to use an entire egg and make a small cake still edible! Trust me, I've tried. My new solution: applesauce!
If you make this strategically, you will only dirty a couple of spoons and a mug!
Chocolate Mug Cake
1 Tbl cocoa
8 tsp hot water, divided
4 Tbl sugar
pinch of baking soda
pinch of baking powder
pinch of salt
4 tsp vegetable (or canola) oil
1 Tbl applesauce
1/2 tsp vanilla
In mug, combine coca and 4 tsp hot water. Microwave 20-30 seconds or until slightly thickened and very hot. Stir. Add remaining ingredients. Stir well. Microwave 2-2.5 minutes until cake pulls away from sides. Moist areas may remain but will disappear upon standing. If you have the patience and want to invert onto a plate, wait a few minutes for the cake to cool.
Friday, November 11, 2011
Fun Time Friday - Home Depot FREE Kids Workshop
Did you know that on the first Saturday of every month, Home Depot offers a FREE Kids Workshop? We've been bringing Peter for the last several months and it's definitely a highlight that he talks about for at least a week afterwards.

The projects are very simple, although an adult's help is needed, and we always walk away with something useful that Peter can share and we can all enjoy! Along with the materials and directions of the project, Peter has received a Home Depot apron that he wears every time we go and he receives a pin for each project that he completes. I'm sure his apron will soon be filled with pins as we continue to enjoy this free and fun activity!

Check out Home Depot's website for more information: http://www.homeimproverclub.com/kidsworkshops.aspx
Thursday, November 10, 2011
Tasty Thursday - Homemade Vanilla Pudding
Who doesn't love pudding?? It's definitely on my list of favorite comfort foods. A couple of years ago I abandoned the pretty little packaged box and ventured out to make my own. It proved to be very easy and extremely tasty!

Vanilla Pudding
2 cups milk (someone try it with a non-dairy milk and tell me how it turns out)
1/2 cup sugar (can substitute 1/2 cup maple syrup for a healthier and maple flavored version)
3 Tbl. cornstarch
1/4 tsp. salt
1 tsp. vanilla extract
1 Tbl. butter
Combine all ingredients and cook over medium heat until mixture thickens, stirring constantly. Do not boil as it will scald the milk, a simmer is best. Chill.
Eat with a spoon, use in a trifle, top with whipped cream, the possibilities and delicious ideas are endless!
Wednesday, November 9, 2011
Whatever Wednesday - Little Blue Truck
Everyone has a favorite childhood book. When I'm asked what mine were I immediately think of "The Very Hungry Caterpillar," "The Napping House," "Where the Wild Things Are," and so many more. Now that Peter is starting to understand stories it's fun to watch him develop an interest in books as well.

Our pediatrician's office has a great program where they give a child a new book at every checkup. I am extremely picky about our books and not one has made it into the donation pile! We recently received "Little Blue Truck" and not only does Peter enjoy it, we love it as well!
The "Little Blue Truck" drives around saying "Beep, Beep, Beep" to all of the local animals. One day a big, mean, dump truck arrives and gets stuck in the mud. When no one will come help him, "Blue" comes to push him out, but he gets stuck too! The animals come to "Blue's" rescue and push him and the "Dump" out of the mud.
Full of rhymes and sounds accompanied by a great lesson in helping others, it is now a treasured book in our collection. If you have not read this book, run to your library, check it out, fall in love, and purchase it!

What was your favorite book as a child? What have been your child's favorite books? Have you found any recently published (in the last 10 years) books that you highly recommend?
"Little Blue Truck" written by Alice Schertle and illustrated by Jill McElmurry. Published by Harcourt Children's Books 2008.
Tuesday, November 8, 2011
Thrifty Tuesday - Infinity Tube Scarf Tutorial
Have you seen these Infinity Scarves? They're apparently really popular right now. My sister sent me a link to one and asked if I would make one, or two, or three, or...I'm sure she'll keep bringing fabric over and asking for more. Perhaps she'll read this tutorial and start making them herself!
These are actually extremely easy to make. So easy that it's really a waste of money to go out and buy one. Want to know how to make it? It only takes 2 straight stitches!!
Buy 1.5 to 2 yards of 40 inch wide fabric. Check the clearance section, you never know what great things can be found there! Cut in half the entire length of fabric (it will be 20 inches wide). This will actually make 2 scarves. If you don't mind an extra seam, you can buy 1 yard and sew the two pieces together to create a 2 yard strip.
Fold the fabric in half lengthwise, right sides together. You should have a strip of fabric that is now 1.5 to 2 yards long that is folded to be 10 inches wide. Pin and stitch along the long side. I give myself a typical 5/8inch seam allowance.

Turn the scarf right side out. The seam you made is now on the inside. Take both open ends of your tube and pin right sides together. You will NOT be able to pin the entire way around.

Stitch along the pinned edge. Once again, you will not be able to stitch the entire way around.

Push this stitched edge into the scarf. You will be left with a small opening. Hand stitch this closed.

You now have an Infinity Tube Scarf for a fraction of the cost!

You can even wear it as hood! Note: This is a different fabric from the first Infinity Scarf that I made.
 | |
| Note: No matter how much this looks like me, I swear it is my sister. |
Buy 1.5 to 2 yards of 40 inch wide fabric. Check the clearance section, you never know what great things can be found there! Cut in half the entire length of fabric (it will be 20 inches wide). This will actually make 2 scarves. If you don't mind an extra seam, you can buy 1 yard and sew the two pieces together to create a 2 yard strip.
Fold the fabric in half lengthwise, right sides together. You should have a strip of fabric that is now 1.5 to 2 yards long that is folded to be 10 inches wide. Pin and stitch along the long side. I give myself a typical 5/8inch seam allowance.

Turn the scarf right side out. The seam you made is now on the inside. Take both open ends of your tube and pin right sides together. You will NOT be able to pin the entire way around.

Stitch along the pinned edge. Once again, you will not be able to stitch the entire way around.

Push this stitched edge into the scarf. You will be left with a small opening. Hand stitch this closed.

You now have an Infinity Tube Scarf for a fraction of the cost!

You can even wear it as hood! Note: This is a different fabric from the first Infinity Scarf that I made.
 |
| Also my sister, not me. |
Monday, November 7, 2011
Munchy Monday - Homemade Salsa
Salsa, nothing complicated about it. Then why am I sharing a salsa recipe? Well, because my sister came over and made a HUGE bowl full and we devoured every. last. drop. You know what? Even Peter enjoyed a large amount of it! If it's good enough that my super picky 2 year old will eat it, it's worthy of the blog.

Salsa is completely relative and you can add as much or as little as you would like. Here is what we did.
Nine...yes, NINE Roma tomatoes. Why Roma? They're meatier and super tasty! Why nine? Because we're little piggies when it comes to salsa. Dice as small as you can. The smaller, the better. You want the chip to get as many little tasty pieces of veggies as it can!
One green pepper. Seed and chop just as small.
3/4 of a large red onion. A red onion makes all the difference! There's a trick to cutting these that my sister just taught me today. If you don't care about this whole salsa thing, memorize this onion cutting method. I can't believe I never thought of this!
Peel the onion and cut across, but NOT all the way through.
 Cut in the opposite direction to create small, perfectly diced sections. Brilliant! Now why didn't I think of that???

You can add a jalapeno pepper as well, but we decided to keep the salsa as kid friendly as possible.
Mix in a teaspoon of dried cilantro (it's cheaper than the fresh stuff, but that would be great as well!) and 1/4 cup lemon juice. And enjoy!!
How did we eat our HUGE bowl of salsa? By the spoonful, with chips, and I even made a baked potato!

I think I'll make an omelet for breakfast with the small amount that we had left...

Salsa is completely relative and you can add as much or as little as you would like. Here is what we did.
Nine...yes, NINE Roma tomatoes. Why Roma? They're meatier and super tasty! Why nine? Because we're little piggies when it comes to salsa. Dice as small as you can. The smaller, the better. You want the chip to get as many little tasty pieces of veggies as it can!
One green pepper. Seed and chop just as small.
3/4 of a large red onion. A red onion makes all the difference! There's a trick to cutting these that my sister just taught me today. If you don't care about this whole salsa thing, memorize this onion cutting method. I can't believe I never thought of this!
Peel the onion and cut across, but NOT all the way through.


You can add a jalapeno pepper as well, but we decided to keep the salsa as kid friendly as possible.
Mix in a teaspoon of dried cilantro (it's cheaper than the fresh stuff, but that would be great as well!) and 1/4 cup lemon juice. And enjoy!!
How did we eat our HUGE bowl of salsa? By the spoonful, with chips, and I even made a baked potato!

I think I'll make an omelet for breakfast with the small amount that we had left...
Friday, November 4, 2011
Fun Time Friday - Fall Placemats

I had Peter do his hand prints on a sheet of construction paper. We used Red, Orange, and Yellow. I purposefully used the darkest colors first so we could see through the lighter colors.

I used an old cereal box to make patterns of our utensils. I took our actual utensils and traced them.

After cutting out the patterns, I traced them on construction paper (we made 4 placemats). I traced our plates and cups as well.

On the plates we made fall trees. The trunk was made with Peter's forearm and hand and the leaves were additional hand prints. After all of the pieces were made I glued it together and we used a sponge to stamp around the border. The placemat was then covered on both sides with contact paper (it could also be laminated).

Thursday, November 3, 2011
Tasty Thursday - Pumpkin Puree

I had Peter paint one of our pumpkins (we used a tempera paint that easily comes off with water) that we displayed for Halloween, but I had future plans for this multicolored creation!

After scrubbing the pumpkin clean, I only had a pumpkin puree on my mind!

Cut the pumpkin open, clean out the seeds, and cut into 8 pieces. Place the pieces skin side up in a baking dish with enough water to cover the bottom of the pan.

Bake at 400 degrees for 30-45 minutes. The skins will turn a beautiful red and a fork should easily go through each piece. Set aside and let cool.

Remove the skins, either with your hands or a knife.

Place in a food processor and puree.

To thicken, create a straining system with cheese cloth to remove some of the liquid.

Store in containers and freeze.

Note: I had a 5 pound pumpkin and made 2 pints of puree.
Wednesday, November 2, 2011
Whatever Wednesday - Our Halloween in Pictures
 |
| My little monkey and his unhappy banana. |
 |
| Total cost to make: $8.50! |
 |
| Yes, I put my baby in a pumpkin. |
 |
 |
| "Peter, Peter, pumpkin eater, had a sister and couldn't keep her..." |
 |
| We carved our big pumpkin and watched it glow! |
Tuesday, November 1, 2011
Day 40, BIG changes, and Homemade Lip Balm
We made it!! Today is day 40 of our 40 Day Challenge! What have we learned and gained from this adventure? I thought we lived a very frugal life but we have discovered that we can be even more frugal with little work! We slowly ate our way through a freezer full of meats that needed to be rotated out, I baked a lot, had to get creative when we ran out of things and when I didn't have wrapping paper for a birthday party, sewed a Halloween costume, and we had fun the entire time! Hubby and I were discussing the past 40 days and we've decided that we will not be going back to the old way. We won't be following our rules as closely as we did, but we saved a lot more money than we ever thought we could!
During the past 40 days I had plenty of time to reflect on my blog. Yep, my blog. My life requires structure and my blog just hasn't had it (hence the random posts that are sometimes consistent and other times nonexistent). So, I have created structure! I will now have themes to everyday to help bring about ideas for myself and consistency to you, my readers.
The BIG reveal
It all looks and seems overwhelming, but really, this is my life and my blog is a reflection of my life. Now to just snap pictures along the way!

In honor of our first Thrifty Tuesday, I thought I would share my homemade lip balm recipe. I've been making this for a few years but have finally tweaked the recipe enough and have found the perfect ratios!

Melt beeswax and olive oil in the microwave, 30 seconds at a time at half power.

Using a needle, puncture a hole in the vitamin E capsules and drain into beeswax mixture. Stir.

Fill containers. I have seen many different containers at our local natural food store and online. Ours have now been reused multiple times.

Let cool and then cap.
These would make great stocking stuffers!!
Recipe:
1 oz Beeswax (found in the candle section of your local craft store)
2 Tbls Olive Oil
3-4 Vitamin E capsules
During the past 40 days I had plenty of time to reflect on my blog. Yep, my blog. My life requires structure and my blog just hasn't had it (hence the random posts that are sometimes consistent and other times nonexistent). So, I have created structure! I will now have themes to everyday to help bring about ideas for myself and consistency to you, my readers.
The BIG reveal
- Mondays: Munchies Monday - All things snack food. Some healthy, some not, but ALL delicious!
- Tuesdays: Thrifty Tuesday - Ways to save money! Do-it-yourself projects, bargain ideas, and anything money!
- Wednesdays: Whatever Wednesday - Who knows where this could go! Fun pictures, cute things my kids say/do, random topics that don't fit anywhere else. The possibilities are endless!
- Thursdays: Tasty Thursday - All things tasty! Recipes for dinner, breakfast, dessert, YUM!
- Fridays: Fun Time Friday - Want some fun ideas for the kids? See what kinds of crazy projects we're up to around here!
It all looks and seems overwhelming, but really, this is my life and my blog is a reflection of my life. Now to just snap pictures along the way!

In honor of our first Thrifty Tuesday, I thought I would share my homemade lip balm recipe. I've been making this for a few years but have finally tweaked the recipe enough and have found the perfect ratios!

Melt beeswax and olive oil in the microwave, 30 seconds at a time at half power.

Using a needle, puncture a hole in the vitamin E capsules and drain into beeswax mixture. Stir.

Fill containers. I have seen many different containers at our local natural food store and online. Ours have now been reused multiple times.

Let cool and then cap.
These would make great stocking stuffers!!
Recipe:
1 oz Beeswax (found in the candle section of your local craft store)
2 Tbls Olive Oil
3-4 Vitamin E capsules
- Melt beeswax and olive oil in the microwave, 30 seconds at a time at half power.
- Puncture a hole in vitamin E capsules and drain into beeswax mixture. Stir.
- Fill containers.
- Let cool and then cap.
- Makes approx. 10 tubes of lip balm.
Friday, October 14, 2011
Day 22
I definitely had to check the calendar to discover what day of our 40 Day Challenge we were on. Why? We are so into the groove of this no shopping thing that I don't even think about it anymore! Sure, I've considered making a grocery list here and there (my whole life is run by a list), but why? We're out of some types of flour, I'll just adjust our baking. We no longer have any lettuce or tomatoes, but it's fall, who eats salad this time of year? Until we run out of toilet paper, I won't be calling a household emergency. Even then, do I really want to get the kids ready for the store? Maybe we'll start using cloth...or not.
What have I been doing with all of my free time? Redirecting my lists towards something productive. I have lists and lists of blog post ideas, things to make, thoughts to share. Why haven't I posted them yet? I'm still in the building stage. Notice the new blog layout? It's bright, it's fun, and it's the only hint you're getting!
When will the big reveal happen? After our 40 Day Challenge. I'm giving myself a couple more weeks to polish and prepare.
I'll leave you with a photo of the little guy. Why? Because he's cute and a photo of toilet paper isn't all that exciting.

Monday, October 10, 2011
No Bottles Please!
Sometimes I think I really confuse people with my "crazy" lifestyle choices. Okay, so maybe I'm a little crazy, but I do have a reason for everything I do!
I'm the girl that:
With a new baby, the thoughts of breastfeeding are always on my mind. My little girl constantly needs me to help sustain her life. Yep, I'm that important. Without me, she could not exist.
Why do I not give my babies bottles or pacifiers? I spend nine continuous months with each of my children. All day, everyday, through sickness and tired joints, while they are safely guarded and growing within me. Some days I dream of allowing my husband to take over for just an hour, yet that is impossible. I like to think of infancy as a slow weaning process. Babies need milk to survive. I can provide that. Just because a child is no longer in my womb does not mean that they no longer need me for their survival. As a woman I am naturally equipped to take care of my child's every need. Sure, it's draining and I do enjoy that my husband is now able to hold the baby, but just because we are no longer physically connected doesn't mean that I am not a necessity in my child's life. When my baby is hungry, I am there. Always there. To strip a child from this natural weaning process breaks my heart.
Am I opposed to people who give their child a bottle? Of course not. There are reasons why a bottle is a helpful tool, but they are far too over used. To give a child a bottle immediately after birth without ever making an attempt to breastfeed, that's just a selfish choice. Our society has perverted the breast in such a way that women feel ashamed to feed their children. Those that do choose to breastfeed feel forced to hide their children under blankets, sit on a public toilet, or they risk being on the local news for "offending" someone. If my baby is hungry, I feed her. No need to stare or feel as though I am scandalizing the world. It is the introduction and common place of the bottle that has scandalized and stripped babies of the most important thing necessary; their mother.
I'm the girl that:
- Always wears a skirt. "Does that girl even own a pair of pants!?!"
- Enjoys labor (yep, I absolutely LOVE childbirth...the natural, unmedicated type)
- Will home school my children and they won't be socially awkward
- Dreams of having a house full of children (8, 10, 12, lots of babies!)
- Has never and will never touch any form of contraception, yet I'm not constantly pregnant
- Won't give my babies a bottle or a pacifier, in fact I wouldn't even know how to prepare one!
 |
| Who can resist these pudgy cheeks?? |
Why do I not give my babies bottles or pacifiers? I spend nine continuous months with each of my children. All day, everyday, through sickness and tired joints, while they are safely guarded and growing within me. Some days I dream of allowing my husband to take over for just an hour, yet that is impossible. I like to think of infancy as a slow weaning process. Babies need milk to survive. I can provide that. Just because a child is no longer in my womb does not mean that they no longer need me for their survival. As a woman I am naturally equipped to take care of my child's every need. Sure, it's draining and I do enjoy that my husband is now able to hold the baby, but just because we are no longer physically connected doesn't mean that I am not a necessity in my child's life. When my baby is hungry, I am there. Always there. To strip a child from this natural weaning process breaks my heart.
Am I opposed to people who give their child a bottle? Of course not. There are reasons why a bottle is a helpful tool, but they are far too over used. To give a child a bottle immediately after birth without ever making an attempt to breastfeed, that's just a selfish choice. Our society has perverted the breast in such a way that women feel ashamed to feed their children. Those that do choose to breastfeed feel forced to hide their children under blankets, sit on a public toilet, or they risk being on the local news for "offending" someone. If my baby is hungry, I feed her. No need to stare or feel as though I am scandalizing the world. It is the introduction and common place of the bottle that has scandalized and stripped babies of the most important thing necessary; their mother.
Tuesday, October 4, 2011
A Healthy, Raw, Cookie Dough
Who hasn't licked the beaters after making cookie dough despite being told not to eat raw eggs? It's delicious! After all, an ice cream has been made in cookie dough's honor!
I recently came across this recipe over at Chocolate-Covered Katie and had to give it a try. Who would guess that the main ingredient is chickpeas!?!

Add all ingredients (except chocolate chips) into a food processor or blender and blend until smooth. Stir in chocolate chips. This is meant to be eaten raw as I doubt it would bake well.
Verdict: I'm in LOVE!!! It definitely helps with the night time munchies and it's a great way totrick help Peter to eat something healthy! Hubby thinks it's "Okay, but not great" but I'm just going to ignore that.
Additional Note: Even more amazing after leaving it in the fridge overnight!! (I may or may not have had a bite with breakfast.)

I recently came across this recipe over at Chocolate-Covered Katie and had to give it a try. Who would guess that the main ingredient is chickpeas!?!
- 1 1/2 cups chickpeas (1 can, drained)
- pinch of salt
- 1/8 tsp baking soda
- 2 tsp vanilla extract
- 1/4 cup peanut butter (or any nut butter)
- 1/4 cup milk (or any non-dairy milk)
2/3 cup brown sugar - 3 Tbls oats
- 1/3 cup chocolate chips

Add all ingredients (except chocolate chips) into a food processor or blender and blend until smooth. Stir in chocolate chips. This is meant to be eaten raw as I doubt it would bake well.
Verdict: I'm in LOVE!!! It definitely helps with the night time munchies and it's a great way to
Additional Note: Even more amazing after leaving it in the fridge overnight!! (I may or may not have had a bite with breakfast.)
Monday, October 3, 2011
Day 11
Day 11 of our 40 Day Challenge.
We're a quarter of the way through our 40 day journey and honesty, I really don't feel as though it is hard enough. Are we cheating? No. We have so far spent $1.99 on a calendar. Sure, I could make a calendar, but I love how this one is set up and I've been using it for a few years now. I found it at a surplus store and as the saying goes "You should have bought it when you saw it," so I bought it.
Perhaps this challenge feels easy since we have become fairly self sufficient in most of our needs. Our babies are virtually free. I already have all the cloth diapers I need. Between both of my diapered kids (thankfully one is almost potty trained), I'm estimating we save about $80 a month! And I am constantly, without effort, producing food for my little girlie. I don't even want to think about how much formula would cost a month!
I've also found out how thankful I am and helpful it is to buy everything in bulk. When I see something on sale, we start filling the cart. Almost everything we have and are currently eating our way through was bought in large quantities while it was on sale.
What have I missed? There is something about grocery shopping that I really enjoy. Filling our cart with delicious foods and dreaming up ways to feed my family while trying to keep my two children calm and appropriate for public. You know what, now that I think of it, I don't really miss that adventure.
I have also found more time to continue my cleaning adventure. I'm quite determined to get my house in tip top shape. It really is starting to get there. It's amazing how much free time you can find when you aren't busy getting children prepared to go shopping! Have I mentioned how much I don't miss that?
On a side note: check out my friend's new blog A Family of Three Was Meant to Be. Her and her husband have decided to take on their own 40 day challenge! They are keeping track of how much they are saving every week and then taking that money and donating it to the Church!! In one week, they have already saved $75!
How could you incorporate a 40 Day Challenge into your home??
 |
| Homemade whole wheat pasta, sauce made from fresh tomatoes, and homemade peasant bread. |
We're a quarter of the way through our 40 day journey and honesty, I really don't feel as though it is hard enough. Are we cheating? No. We have so far spent $1.99 on a calendar. Sure, I could make a calendar, but I love how this one is set up and I've been using it for a few years now. I found it at a surplus store and as the saying goes "You should have bought it when you saw it," so I bought it.
Perhaps this challenge feels easy since we have become fairly self sufficient in most of our needs. Our babies are virtually free. I already have all the cloth diapers I need. Between both of my diapered kids (thankfully one is almost potty trained), I'm estimating we save about $80 a month! And I am constantly, without effort, producing food for my little girlie. I don't even want to think about how much formula would cost a month!
I've also found out how thankful I am and helpful it is to buy everything in bulk. When I see something on sale, we start filling the cart. Almost everything we have and are currently eating our way through was bought in large quantities while it was on sale.
What have I missed? There is something about grocery shopping that I really enjoy. Filling our cart with delicious foods and dreaming up ways to feed my family while trying to keep my two children calm and appropriate for public. You know what, now that I think of it, I don't really miss that adventure.
I have also found more time to continue my cleaning adventure. I'm quite determined to get my house in tip top shape. It really is starting to get there. It's amazing how much free time you can find when you aren't busy getting children prepared to go shopping! Have I mentioned how much I don't miss that?
On a side note: check out my friend's new blog A Family of Three Was Meant to Be. Her and her husband have decided to take on their own 40 day challenge! They are keeping track of how much they are saving every week and then taking that money and donating it to the Church!! In one week, they have already saved $75!
How could you incorporate a 40 Day Challenge into your home??
Tuesday, September 27, 2011
Cookie Love
Day 4 of our 40 Day Challenge.

We all have "one of those days" and mine was definitely yesterday. To cheer me up, Hubby decided to make me something. He wouldn't often go out and buy something to bring about my happiness, but since we've been so focused on making everything, he opted to make me some Peanut Butter Cookies. If cookies don't scream love, I don't know what does! Ok, maybe chocolate. Yeah, chocolate screams love. But cookies come in close behind!
Did you know that you can substitute 1/4 cup of applesauce per egg or 1/2 of a mashed banana? I do it quite often and since we had run out of eggs, Hubby used applesauce instead.
Peanut Butter Cookies
recipe from The Fannie Farmer Cookbook
1 cup shortening
1 tsp vanilla
1 cupe granulated sugar
1 cup brown sugar
2 eggs, beaten (we were out, so he substituted 1/4 cup applesauce per egg)
1 cup peanut butter
3 cups flour
1/8 tsp salt
2 tsp baking soda
Preheat the oven to 350F and grease some cookie sheets. In a mixing bowl, thorough cream the shortening, vanilla, and sugars. Add the eggs and beat well. Stir in the peanut butter. Mix together the flour, salt, and baking soda, and add to the peanut butter mixture, combining thoroughly. Form into tiny balls with the palm of your hands and place on the cookie sheets. Press each cookie twice with the back of a fork to make a crisscross design. Bake about 8-10 minutes or until firm.
Saturday, September 24, 2011
Whoopie Pie Cake and Fruit Snacks
What does a Whoopie Pie Cake and fruit snacks have in common? The adventures of Day 2 of our 40 Day Challenge!
 Several days ago I volunteered to make a cake for my grandmother's birthday (we're celebrating tomorrow). Definitely didn't think that one through before deciding to embark on this new adventure. I was going to make a fancy cake with candies on it, but alas, we can't buy them right now. So, I found a marshmallow frosting and made a chocolate cake! To make it all fancy, I'm calling it a Whoopie Pie Cake.
 Then came the fruit snacks. I don't know about you, but I LOVE fruit snacks. Who doesn't enjoy reliving their childhood? I recently came across a recipe to make my own. I'm all about multitasking, so while my cake was in the oven and the kids were napping, I moved onto my blueberry fruit snacks. Boy are they delicious!! Definitely not as sweet as the processed version, but so much healthier. No sugar and nothing fake about them. The only problem? They're going to disappear far too quickly.
 Several days ago I volunteered to make a cake for my grandmother's birthday (we're celebrating tomorrow). Definitely didn't think that one through before deciding to embark on this new adventure. I was going to make a fancy cake with candies on it, but alas, we can't buy them right now. So, I found a marshmallow frosting and made a chocolate cake! To make it all fancy, I'm calling it a Whoopie Pie Cake.Then came the fruit snacks. I don't know about you, but I LOVE fruit snacks. Who doesn't enjoy reliving their childhood? I recently came across a recipe to make my own. I'm all about multitasking, so while my cake was in the oven and the kids were napping, I moved onto my blueberry fruit snacks. Boy are they delicious!! Definitely not as sweet as the processed version, but so much healthier. No sugar and nothing fake about them. The only problem? They're going to disappear far too quickly.
Subscribe to:
Comments (Atom)


